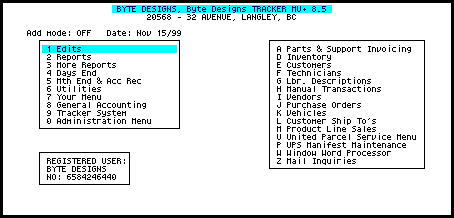
This is the a sample of the Main Menu. The MAIN MENU is the focal point of the system and allows you access the various areas of the Byte Designs Software System.
The menu on YOUR screen may not look exactly like that shown in this user guide. Each installation of Tracker is Somewhat dependent on how you personalized your Byte Designs software during installation.
Keep in mind that while the menus may not look the same as the illustrations in this manual, they work the same. That is to say pick your task and press the letter to the left of the task description or use the arrows to highlight a task and press the ENTER/RETURN key.
The menu window to the left is considered the main menu, listing major tasks as a group. There is a sub menu associated with most group tasks. The sub menu is shown in the right window as each task in the main menu section is 'highlighted'.
A shortcut method of menu selection is to utilize the number or letter shown to the left of each task or selection. In short, if you can see your destination, press the number or letter to the left of your 'destination'.
When the System is first loaded or when you are returning to the menu from a task the '1 Edits' selection is highlighted and the Edits sub menu is displayed in the right window.
You can select a sub menu (the menu on the right) by pressing a number on the main menu (the menu on the left).
To make the actual task, or job selection you press a letter on the sub menu.
or -
you can use the RIGHT/LEFT, UP/DOWN arrows to get around the menus. When you have highlighted a selection you want-press the ENTER or RETURN key.
Using the arrows to make a selection is referred to as 'highlighting' a desired task. Even when you make your selection directly by letter or number the task is highlighted as the selection shown is executed.
To find out what a task will do: highlight a selection and press the 'help key', the ? (question mark), usually found slightly above and to the right of the space bar. The question mark shares a key with the forward slash '/'. To actually get the question mark you must hold the shift key down while pressing the '?/' key.
Add Mode
Add Mode may be selected on/off in System Maintenance.
Add Mode ON
With the ADD mode selected ON, indicated on the menu screen with +ON+, the computer will accept numeric data in the same fashion as your desk calculator, when you have it selected for the automatic placement of 2 decimal places.
Entering four digits (1234) will place the decimal and make the entry 12.34, entering only the first two digits (12) will take the entry as .12 cents.
If you enter 1234. (one, two,three,period), the system will add the 2 trailing zero's and accept the entry as 1234.00.
Add Mode OFF
With the ADD mode selected OFF, the decimal point, if any, has to be placed by you.
Trailing zero's do not have to be entered. For example, 12 would be formatted to 12.00 by the computer.
If the 12 was entered at a percent field while entering details in Inventory, it would be formatted to the correct number, eg: 12.0%.
About Add Mode
If your Byte Designs Software System was personalized to work COST and/or SELLING PRICES to 3 or more decimal places ADD MODE will not be available at prompts that are set to show amounts to more than 2 decimal places.-The period will have to be placed manually as you enter the amount.
Date in Use
The date in use for reports, invoicing and other dated material that does not receive its individual date from the operator, is the system date.
The system date is the date that was entered when the computer was first turned on. If the computer is not turned off, the date will advance at midnight.
Your computer may have a clock built in, in which case you will not be asked for the time and date on power up.
If you wish to change the date use System Maintenance or change the date with the appropriate operating system command.
If the date was changed in System Maintenance it will only effect the user that changed it. It will remain in use at that user station until changed again or the System is reloaded.
The 'date in use' is displayed on the main menu screen. Date in use means that is the date that the System will put on invoices, reports and other 'dated' jobs.
To assure you are working with the 'intended' date, normally today's date, please remember to check the date as it appears on the menu screen prior to selecting a date dependent task, such as invoicing, reports, etc.
Visit the Byte Designs Tracker Website
Copyright © 2005 Byte Designs Ltd. All Rights Reserved.